Monday, 4 November 2013

Start the Workflow based on User Group Permission using SharePoint Object Model

                SPWeb web = SPContext.Current.Web;
                SPRoleDefinitionBindingCollection usersRoles = web.AllRolesForCurrentUser;
                SPRoleDefinitionCollection roleDefinitions = web.RoleDefinitions;
                SPRoleDefinition roleDefinition = roleDefinitions["Full Control"];
                if (usersRoles.Contains(roleDefinition))
                {
                    StartWorkflow.Visible = true;

                }
                else
                {
                    Response.Redirect(web.Url + "/_layouts/sharepointworkflow/accessdenied.aspx");

                }

Tuesday, 15 October 2013

Create Custom Error Logging in SharePoint 2010

Building a Scalable Architecture; SharePoint Records Management
One of the pieces of developing custom components is logging information. No matter if it’s for diagnostic purposes or when an error occurs, logging allows you to track the health of your custom component. When developing custom components for SharePoint 2007 we hadn’t much choice. Although SharePoint 2007 shipped with the Unified Logging Service, we couldn’t use it. The SharePoint SDK was pretty clear about it: although some methods were publicly available, ULS was for internal use only and was not supposed to be used in custom code. Because of this, we couldn’t provide a similar logging experience to SharePoint and had to develop custom logging solutions. SharePoint 2010 changes this situation: using the new ULS is now supported and may be used for logging in custom code.

Logging using SharePoint 2010 101

Using the SharePoint 2010 ULS is pretty easy. Using just a few lines of code you can log information from your custom components:


try
{
    var i = 0;
    var a = 2 / i;
}
catch (Exception ex)
{
    SPDiagnosticsService.Local.WriteTrace(0, new SPDiagnosticsCategory("My Category", TraceSeverity.Unexpected, EventSeverity.Error), TraceSeverity.Unexpected, ex.Message, ex.StackTrace);
}
Calling the snippet above will log the following message in the ULS log:
Custom message logged in the SharePoint ULS log.
It works…. almost. Did you notice the Unknown label where the product name should be mentioned? While it’s not necessary for simple solutions, it would definitely make it easier to track which messages originate from which solutions if we actually could provide the product name.

Logging v2

The SharePoint API doesn’t provide any method which would allow you to provide the name of the product that logged the message. In order to write the product name to the ULS you have to create a custom Logging Service. You can do this by inheriting from the SPDiagnosticsServiceBase class:


public class LoggingService : SPDiagnosticsServiceBase
{
    public static string MaventionDiagnosticAreaName = "Mavention";
    private static LoggingService _Current;
    public static LoggingService Current
    {
        get
        {
            if (_Current == null)
            {
               _Current = new LoggingService();
            }
            return _Current;
        }
    }
    private LoggingService()
        : base("Mavention Logging Service", SPFarm.Local)
    {
    }
    protected override IEnumerable<SPDiagnosticsArea> ProvideAreas()
    {
        List<SPDiagnosticsArea> areas = new List<SPDiagnosticsArea>
        {
            new SPDiagnosticsArea(MaventionDiagnosticAreaName, new List<SPDiagnosticsCategory>
            {
                new SPDiagnosticsCategory("WebParts", TraceSeverity.Unexpected, EventSeverity.Error)
            })
        };
        return areas;
    }
    public static void LogError(string categoryName, string errorMessage)
    {
        SPDiagnosticsCategory category = LoggingService.Current.Areas[MaventionDiagnosticAreaName].Categories[categoryName];
        LoggingService.Current.WriteTrace(0, category, TraceSeverity.Unexpected, errorMessage);
    }
}
Instead of using the SPDiagnosticService.Local you would use now our custom LoggingService:


try
{
    var i = 0;
    var a = 2 / i;
}
catch (Exception ex)
{
    LoggingService.LogError("WebParts", ex.Message);
}
Let’s take a look at the result:
Custom message logged in the SharePoint ULS log. The message is logged together with the product name.
As you can see using a custom Logging Service, you can log the name of your solution what makes it easier to track your custom messages.
When implementing custom Logging Service you have to provide a list of categories and logging levels supported by the service. You can do this by overriding the ProvideAreas method. In my example I implemented only one category but depending on your solution you could add multiple categories and severity levels.

Saturday, 5 January 2013

SharePoint 2010 and Adobe PDF


The following post is an update from the original ‘SharePoint 2007 and Adobe PDF‘ post written in 2007. These notes are based on SharePoint 2010 Beta 2 (made publicly available in November 2009). Once the product has officially launched on 12 May 2010, an update will be posted if any changes are made to the process. The process is very similar to SharePoint 2007, with minor changes to folder location (14 instead of 12) and a slightly different administration user interface in the browser.
SharePoint 2010 and Adobe PDF
SharePoint Server 2010, like its predecessors, includes indexing and search capabilities. But what doesn’t come out of the box is the ability to index and search for PDF documents. PDF is a format owned by Adobe, not Microsoft. If you want to be able to find Adobe PDF documents, or have the PDF icon appear when viewing PDF files in a SharePoint document library (see image above), you will need to set it up for yourself. This post describes how to.
  1. Download and install Adobe’s 64-bit PDF iFilter*1 –http://www.adobe.com/support/downloads/detail.jsp?ftpID=4025
  2. Download the Adobe PDF icon (select Small 17 x 17) –http://www.adobe.com/misc/linking.html
    1. Give the icon a name or accept the default: ‘pdficon_small.gif’
    2. Save the icon (or copy to) C:\Program Files\Common Files\Microsoft Shared\Web Server Extensions\14\TEMPLATE\IMAGES
  3. Edit the DOCICON.XML file to include the PDF icon
    1. In Windows Explorer, navigate to C:\Program Files\Common Files\Microsoft Shared\Web Server Extensions\14\TEMPLATE\XML
    2. Edit the DOCICON.XML file (I open it in NotePad, you can also use the built-in XML Editor)
    3. Ignore the section <ByProgID> and scroll down to the <ByExtension> section of the file
    4. Within the <ByExtension> section, insert <Mapping Key=”pdf” Value=”pdficon_small.gif” /> attribute. The easiest way is to copy an existing one – I usually just copy the line that starts <Mapping Key=”png”… and replace the parameters for Key and Value (see image below)
    5. Save and close the file
      SharePoint 2010 and Adobe PDF DOCICON.XML
  4. Add PDF to the list of supported file types within SharePoint
    1. In the web browser, open SharePoint Central Administration
    2. Under Application Management, click on Manage service applications
    3. Scroll down the list of service apps and click on Search Service Application
    4. Within the Search Administration dashboard, in the sidebar on the left, click File Types
    5. Click ‘New File Type’ and enter PDF in the File extension box. Click OK
    6. Scroll down the list of file types and check that PDF is now listed and displaying the pdf icon.
    7. Close the web browser
  5. Stop and restart Internet Information Server (IIS)*2 Note: this will temporarily take SharePoint offline. Open a command line (Start – Run – enter ‘cmd’) and type ‘iisreset’
  6. Perform a full crawl of your index. Note: An incremental crawl is not sufficient when you have added a new file type. SharePoint only indexes file names with the extensions listed under File Types and ignores everything else. When you add a new file type, you then have to perform a full crawl to forcibly identify all files with the now relevant file extension.
That’s it. If you now perform a search, PDF files should be displayed in results where they match the search query, along with the PDF icon on display in results. The icon should also be visible in any document libraries that contain PDF files.
* Additional Notes:
  1. At time of writing (March 2010), Adobe has published PDF iFilter 9 for 64-bit applications, tested on SharePoint 2007 but not yet listed as tested on SharePoint 2010. So far, it is working fine on my builds of SharePoint 2010 (Beta versions)
  2. When setting this up, I initially just restarted the search service rather than IIS but found myself locked out of SharePoint. Resetting IIS fixed it. I don’t know for certain if you also need to restart the search service. Will test on the next build and update here.
  3. As with SharePoint 2007, there are alternative PDF ifilters. The most well known is Foxit Pro – http://www.foxitsoftware.com/. Rumoured to perform indexing faster than using Adobe’s iFilter. I can’t comment, I haven’t tested it. Given PDFs don’t change (they are usually PDFs specifically to not be edited) they are only indexed when first uploaded or when you perform a full crawl. Most organisations should primarily be performing incremental crawls – updating the index with content that has been added or changed rather than re-indexing everything
  4. An absolute cheat for getting round the need to do registry edits is to install Adobe Reader on your server…
  5. There’s a Powershell script for doing all of this, see Johan Skoglund’s blog – Use Powershell to configure PDF search in SharePoint 2010. Haven’t tried it yet, will give it a go on the next demo build and it’s been confirmed int he comments
  6. Another suggestion from the comments – you don’t have to use the default icons (but do make sure whatever ones you do use are licensed or free to use).  Thanks to Jon for suggesting http://www.iconmaker.com where you can search for icons free to use commercially.  Nothing stopping you from using your own icons for all the different file types…

Expand and Collapse the SharePoint Web parts.


1. Click on the Edit page Under "Site Actions".
2.Add Content Editor Web part any Zone.
3.Click on the Web part. "Click here to add content"
4.Click On "Edit Html Source" on the Ribbon.
5.Add following code.


<script type="text/javascript">
// Add the Web Part Titles here to have them opened by default
var wpsToSkip = ['Search Documents','sandbox'];
 //Add multiple Web parts to skip the Collapse
//var wpsToSkip = ['Search Documents','Pending Documents','sandbox'];


function wpExpander() {
 var theTDs = document.getElementsByTagName("TD");
 for (var t=0;t<theTDs.length;t++) {
  var id = theTDs[t].id;
  if (id.match("WebPartTitleWPQ")) {
   id = id.substr(id.indexOf("WPQ"));
   var title = (theTDs[t].innerText || theTDs[t].textContent).replace(/[\n\r]/,'');
   var strImg = "<img style='margin:6px 5px 0px 2px;cursor:hand;float:left;' ";
   if (wpsToSkip.join().match(title)) {
    strImg += "onClick='showHide(\""+id+"\",this)' src='/_layouts/images/minus.gif'>";
   } else {
    strImg += "onClick='showHide(\""+id+"\",this)' src='/_layouts/images/plus.gif'>";
    document.getElementById("WebPart"+id).style.display = "none";
   }
   theTDs[t].innerHTML = strImg + theTDs[t].innerHTML;
  }
 }
}


function showHide(i,o) {
 var wp = document.getElementById("WebPart"+i);
 wp.style.display = (wp.style.display=="") ? "none" : "";
 o.src = (o.src.match(/plus.gif/)) ? "/_layouts/images/minus.gif" : "/_layouts/images/plus.gif";
}


_spBodyOnLoadFunctionNames.push("wpExpander()");
</script>

Friday, 10 August 2012

Walkthrough: Creating a simple Sequential Workflow with a custom Task Form(Application Page) in SharePoint 2010 using Visual Studio 2010

Posted by ikarstein on 2011/03/30

In this walkthrough I want to show you how to create a Sequential Workflow with Visual Studio 2010 for use in SharePoint 2010. – I will show how to create a custom Task Form for interaction with users. The Task form will be a native SharePoint list form. No InfoPath. There are many InfoPath samples out there but they cannot be used on a SharePoint Foundation 2010 platform. But workflows can be used on SharePoint Foundation 2010 too!
To reproduce the following steps you need to create a SharePoint site. – In the walkthrough I’ll use a Site Collection located at “http://sharepoint.local/sites/workflow”.
This blog post is part 1 of 2. It describes the steps 1 to 15. Read part 2 here: http://ikarstein.wordpress.com/2011/03/30/walkthrough-creating-a-simple-sequential-workflow-with-a-custom-task-form-in-sharepoint-2010-using-visual-studio-2010-part-2-of-2/
You can download – and help to develop – the whole demo project source code at Codeplex: http://spworkflowdemo.codeplex.com/
(If you need assistance for the deployment process because of deployment errors please see this third post of this series: http://ikarstein.wordpress.com/2011/04/22/walkthrough-creating-a-simple-sequential-workflow-with-a-custom-task-form-in-sharepoint-2010-using-visual-studio-2010-part-3-of-21/)
Let’s start…
1. We create the Site Collection. Use the “Blank Site” site template.
image
2. In Visual Studio 2010 we create a Empty SharePoint Project. I named it “ik.SharePoint2010.Workflow”
image
We create it with “Deploy as farm solution” and specify the location “http://sharepoint.local/sites/workflow/”.
image
3. This is the project structure at start:
image
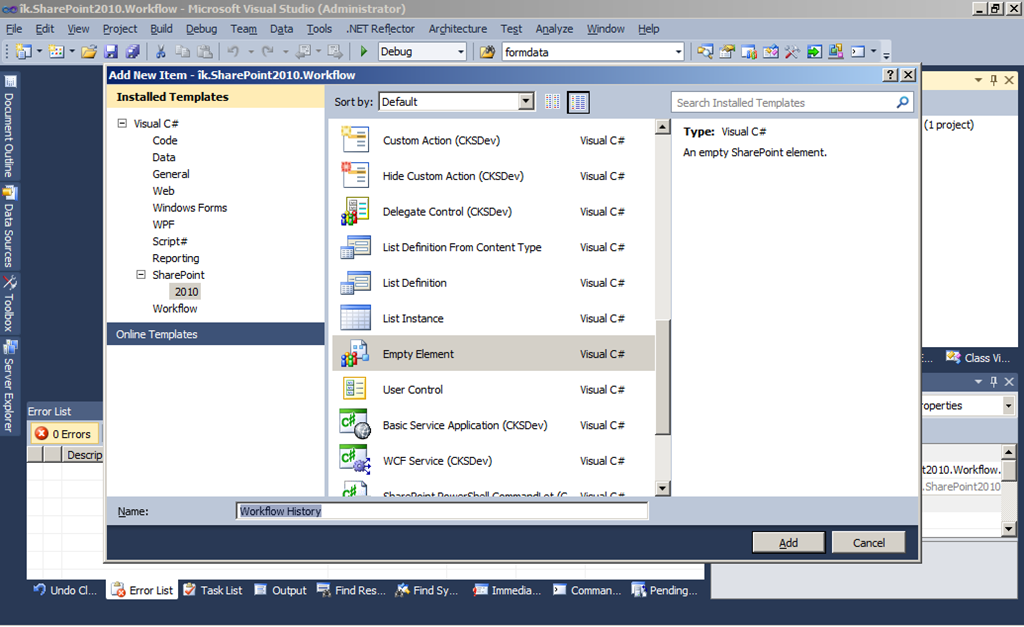
4. First we need to create an instance of the Workflow History list that is needed for the workflow.
Create a new “Empty Element” project item named “Workflow History”.
image
Open the created “element.xml” file and modify it as shown below.
1: <?xml version="1.0" encoding="utf-8"?>
2: <Elements xmlns="http://schemas.microsoft.com/sharepoint/">
3:  <ListInstance Title="Workflow History"
4:  OnQuickLaunch="TRUE"
5:  TemplateType="140"
6:  FeatureId="00BFEA71-4EA5-48D4-A4AD-305CF7030140"
7:  Url="Lists/WorkflowHistory"
8:  Description="">
9:  </ListInstance>
10: </Elements>
The “TemplateType” attribute represents the “Workflow History” list template. It resists on a SharePoint feature with ID “00BFEA71-4EA5-48D4-A4AD-305CF7030140”. It’s a native SharePoint feature.
You can add the attibute “Hidden” to the “ListInstance” tag and set it’s value to “TRUE” to hide the list as it’s done by SharePoint by default for this list. In this case you should also change “OnQuickLaunch” to “FALSE”. For my demo purpose I want to have “Workflow History” visible and on the Quick Launch bar.
5. Now we will create all tools we need for a “Workflow 1”. (May be I’ll create more workflow demos later. So it’s number 1.)
6. We create the SharePoint fields for “Workflow 1”. Therefore we create another “Empty Element” project item named “Workflow 1 Fields”.
image
I’ll create 3 fields for use in the Task Form we will create: Test1, Test2, Test3. They are all fields of type Text.
1: <?xml version="1.0" encoding="utf-8"?>
2: <Elements xmlns="http://schemas.microsoft.com/sharepoint/">
3:  <!-- Fields for Task 1 of Workflow 1-->
4:  <Field ID="{2FE15855-3CAB-44A6-AB29-1600204FCA20}" Name="Workflow1Task1_Test1"
5:  MaxLength="255" DisplayName="Test1" Description=""
6:  Direction="None" Type="Text" Overwrite="TRUE"
7:  xmlns="http://schemas.microsoft.com/sharepoint/" />
8:  <Field ID="{517B22A5-1B89-4C24-82BE-3D4FD99645BC}" Name="Workflow1Task1_Test2"
9:  MaxLength="255" DisplayName="Test2" Description=""
10:  Direction="None" Type="Text" Overwrite="TRUE"
11:  xmlns="http://schemas.microsoft.com/sharepoint/" />
12:  <Field ID="{3ECFF1FE-F56B-4556-8805-4570D9422FF4}" Name="Workflow1Task1_Test3"
13:  MaxLength="255" DisplayName="Test3" Description=""
14:  Direction="None" Type="Text" Overwrite="TRUE"
15:  xmlns="http://schemas.microsoft.com/sharepoint/" />
16: </Elements>
7. Now we create a new “Module” project item named “Workflow 1 Forms”. In this module we will store the Task Form.
image
Remove the “Sample.txt” file from the created module.
Create a new “Application Page” project item named “Task1Form.aspx”.
image
This project item will stored in the folder “Layouts\ik.SharePoint2010.Workflow”.
image
Move the project item “Task1Form.aspx” using Drag & Drop into the module “Workflow 1 Forms”.
image
Remove the “Layouts” folder from the project. It should be empty.
8. We open “Task1Form.aspx”
First we need to edit the “Page” tag of the ASPX site.
1:  <%@ Page Language="C#" AutoEventWireup="true" CodeBehind="Task1Form.aspx.cs" Inherits="ik.SharePoint2010.Workflow.Task1Form" MasterPageFile="~masterurl/default.master"  %>
Now we insert the following code into the “PlaceHolderMain” content placeholder.
1:     <asp:ScriptManagerProxy runat="server" ID="ProxyScriptManager">
2:     </asp:ScriptManagerProxy>
3:     <table width="100%" border="0" cellpadding="0" cellspacing="0">
4:         <tr>
5:             <td valign="top">
6:                 <table cellspacing="0" cellpadding="4" border="0" width="100%">
7:                     <tr>
8:                         <td class="ms-vb">
9:                             &nbsp;
10:                         </td>
11:                     </tr>
12:                 </table>
13:                 <table border="0" width="100%">
14:                     <tr>
15:                         <td>
16:                             <table border="0" cellspacing="0" width="100%">
17:                                 <tr>
18:                                     <td class="ms-formlabel" valign="top" nowrap="true" width="25%">
19:                                         <b>Title:</b>
20:                                     </td>
21:                                     <td class="ms-formbody" valign="top" width="75%">
22:                                         <SharePoint:FormField runat="server" ID="ff4" ControlMode="Display" FieldName="Title" /><br />
23:                                     </td>
24:                                 </tr>
25:                                 <tr>
26:                                     <td width="25%" class="ms-formlabel">
27:                                         <b>Test1:</b>
28:                                     </td>
29:                                     <td width="75%" class="ms-formbody">
30:                                         <SharePoint:FormField runat="server" ID="ff1" ControlMode="Edit" FieldName="Workflow1Task1_Test1" />
31:                                         <SharePoint:FieldDescription runat="server" ID="ff1description" FieldName="Workflow1Task1_Test1"
32:                                             ControlMode="Edit" />
33:                                     </td>
34:                                 </tr>
35:                                 <tr>
36:                                     <td width="25%" class="ms-formlabel">
37:                                         <b>Test2:</b>
38:                                     </td>
39:                                     <td width="75%" class="ms-formbody">
40:                                         <SharePoint:FormField runat="server" ID="ff2" ControlMode="Edit" FieldName="Workflow1Task1_Test2" />
41:                                         <SharePoint:FieldDescription runat="server" ID="ff2description" FieldName="Workflow1Task1_Test2"
42:                                             ControlMode="Edit" />
43:                                     </td>
44:                                 </tr>
45:                                 <tr>
46:                                     <td width="25%" class="ms-formlabel">
47:                                         <b>Test3:</b>
48:                                     </td>
49:                                     <td width="75%" class="ms-formbody">
50:                                         <SharePoint:FormField runat="server" ID="ff3" ControlMode="Edit" FieldName="Workflow1Task1_Test3" />
51:                                         <SharePoint:FieldDescription runat="server" ID="ff3description" FieldName="Workflow1Task1_Test3"
52:                                             ControlMode="Edit" />
53:                                     </td>
54:                                 </tr>
55:                             </table>
56:                         </td>
57:                     </tr>
58:                 </table>
59:                 <table cellspacing="0" cellpadding="4" border="0" width="100%">
60:                     <tr>
61:                         <td nowrap="nowrap" class="ms-vb">
62:                             <asp:Button Text="Save As Draft" runat="server" ID="btnSaveAsDraft" />
63:                         </td>
64:                         <td>
65:                             <asp:Button Text="Complete Task" runat="server" ID="btnComplete" />
66:                         </td>
67:                         <td nowrap="nowrap" class="ms-vb" width="99%">
68:                             <asp:Button Text="Cancel" runat="server" ID="btnCancel" />
69:                         </td>
70:                     </tr>
71:                 </table>
72:             </td>
73:             <td width="1%" class="ms-vb" valign="top">&nbsp;</td>
74:         </tr>
75:     </table>
76:
Now we add some ASP.NET code into the “PlaceHolderPageTitle” content placeholder.
1:     <SharePoint:ListFormPageTitle runat="server" />
Furthermore we add this lines of code into the “PlaceHolderPageTitleInTitleArea” content placeholder.
1:     <span class="die">
2:         <SharePoint:ListProperty Property="LinkTitle" runat="server" ID="ID_LinkTitle" />
3:         : </span>
4:     <SharePoint:ListItemProperty ID="ID_ItemProperty" MaxLength="40" runat="server" />
At least we add the following code into the “PlaceHolderAdditionalPageHead” content placeholder.
1:     <SharePoint:UIVersionedContent UIVersion="4" runat="server">
2:         <contenttemplate>
3:             <SharePoint:CssRegistration Name="forms.css" runat="server"/>
4:         </contenttemplate>
5:     </SharePoint:UIVersionedContent>
You can see the input fields for the three fields of Task 1. Furthermore you see three buttons. For them we now create some “code behind”.
1: using System;
2: using Microsoft.SharePoint;
3: using Microsoft.SharePoint.WebControls;
4: using Microsoft.SharePoint.Utilities; 
5:
6: namespace ik.SharePoint2010.Workflow
7: {
8:     public partial class Task1Form : WebPartPage
9:     {
10:         protected void Page_Load(object sender, EventArgs e)
11:         {
12:             btnSaveAsDraft.Click += new EventHandler (btnSaveAsDraft_Click);
13:             btnComplete.Click += new EventHandler (btnComplete_Click);
14:             btnCancel.Click += new EventHandler (btnCancel_Click);
15:         }
16:
17:         void btnCancel_Click(object sender, EventArgs e)
18:         {
19:             CloseForm();
20:         }
21:
22:         private void CloseForm()
23:         {
24:             if ( ( SPContext.Current != null ) && SPContext.Current.IsPopUI )
25:             {
26:                 this.Context.Response.Write("<script>window.frameElement.commitPopup();</script>" );
27:                 this.Context.Response.Flush();
28:                 this.Context.Response.End();
29:             }
30:             else
31:             {
32:                 string str = this.Page.Request.QueryString["Source"];
33:                 if ( ( str != null ) && ( str.Length > 0 ) )
34:                 {
35:                     SPUtility.Redirect(string.Empty, SPRedirectFlags.UseSource, this.Context);
36:                 }
37:             }
38:         }
39:
40:         void btnComplete_Click(object sender, EventArgs e)
41:         {
42:             SPList l = SPContext.Current.List;
43:             SPListItem li = SPContext.Current.ListItem;
44:             li[SPBuiltInFieldId.TaskStatus] = "Tasks_Completed";
45:             li[SPBuiltInFieldId.PercentComplete] = 1;
46:
47:             SaveButton.SaveItem(SPContext.Current, false, "" );
48:
49:             CloseForm();
50:         }
51:
52:         void btnSaveAsDraft_Click(object sender, EventArgs e)
53:         {
54:             SaveButton.SaveItem(SPContext.Current, false, "" );
55:
56:             CloseForm();
57:         }
58:     }
59: }
We need to modify the “Elements.xml” file of the module named “Workflow 1 Forms”.
1: <?xml version="1.0" encoding="utf-8"?>
2: <Elements xmlns="http://schemas.microsoft.com/sharepoint/">
3:  <Module Name="Workflow 1 Forms" Url="Workflow1Forms" RootWebOnly="FALSE">
4:  <File Path="Workflow 1 Forms\Task1Form.aspx" Url="Task1Form.aspx" />
5:  </Module>
6: </Elements> 
This specifies there to store the “Task1Form.aspx” file in the site structure.
9. In the next step we create the task list that will contain our workflow tasks.
First create a “List Definition” project item named “Workflow 1 Tasks”.
image
Use “Workflow 1 Tasks” as name of the list definition and “Tasks” as base type. Check “Add a list instance…”.
image
10. Now open “Elements.xml” of the new list definition project item.
image
We need to change the identifier of the list type we create! – It must be “107”. This is the list template ID for workflow tasks lists in SharePoint. The workflow designer will search for a list with this type inside the site where a new workflow will be created.
Here is the content of “Elements.xml” after our modification:
1: <?xml version="1.0" encoding="utf-8"?>
2: <Elements xmlns="http://schemas.microsoft.com/sharepoint/">
3:  <ListTemplate
4:  Name="Workflow 1 Tasks"
5:  Type="107"
6:  BaseType="0"
7:  OnQuickLaunch="TRUE"
8:  SecurityBits="11"
9:  Sequence="360"
10:  DisplayName="Workflow 1 Tasks"
11:  Description="Tasks of Workflow 1"
12:  Image="/_layouts/images/itgen.png"/>
13: </Elements>  
11. Now we modify the “Elements.xml” file of the list instance that will be created during deployment:
image
Here we also need to modify the type identifier to “107”. Furthermore we change the list url: “Lists/Workflow1Tasks”.
Here is the complete content of “Elements.xml”:
1: <?xml version="1.0" encoding="utf-8"?>
2: <Elements xmlns="http://schemas.microsoft.com/sharepoint/">
3:  <ListInstance Title="Workflow 1 Tasks"
4:  OnQuickLaunch="TRUE"
5:  TemplateType="107"
6:  Url="Lists/Workflow1Tasks"
7:  Description="Tasks of Workflow 1">
8:  </ListInstance>
9: </Elements> 
In a “real world” scenario we would prevent the list from being listed on the Quick Launch bar. So the corresponding parameter must be set to “FALSE”.
12. Now we need to modify the “Schema.xml” file of the list definition.
image
First we set the list type to “107” and configure some other attributes:
1: <List xmlns:ows="Microsoft SharePoint" Title="Workflow 1 Tasks"
2:  FolderCreation="FALSE" Direction="$Resources:Direction;"
3:  EnableContentTypes="TRUE" VersioningEnabled="TRUE"
4:  Url="Lists/Workflow1Tasks"
5:  Type="107" BaseType="0"
6:  xmlns="http://schemas.microsoft.com/sharepoint/">
7: […]
Now remove the the content types defined in the “ContentTypes” tag in the “schema.xml” file.
image
Insert this content type definition into the “ContentTypes” tag:
1:  <ContentType ID="0x01080100FFbc98c2529347a5886b8d2576b954ef"
2:  Name="Workflow 1 Tasks 1"
3:  Group="Workflow 1 Tasks"
4:  Description="Content Type of Tasks 1 of Workflow 1">
5:  <FieldRefs>
6:  <FieldRef ID="{2FE15855-3CAB-44A6-AB29-1600204FCA20}" Name="Workflow1Task1_Test1" DisplayName="Test1" Required="FALSE" Hidden="FALSE" ReadOnly="FALSE" PITarget="" PrimaryPITarget="" PIAttribute="" PrimaryPIAttribute="" Aggregation="" Node="" />
7:  <FieldRef ID="{517B22A5-1B89-4C24-82BE-3D4FD99645BC}" Name="Workflow1Task1_Test2" DisplayName="Test2" Required="FALSE" Hidden="FALSE" ReadOnly="FALSE" PITarget="" PrimaryPITarget="" PIAttribute="" PrimaryPIAttribute="" Aggregation="" Node="" />
8:  <FieldRef ID="{3ECFF1FE-F56B-4556-8805-4570D9422FF4}" Name="Workflow1Task1_Test3" DisplayName="Test3" Required="FALSE" Hidden="FALSE" ReadOnly="FALSE" PITarget="" PrimaryPITarget="" PIAttribute="" PrimaryPIAttribute="" Aggregation="" Node="" />
9:
10:  <FieldRef ID="{c042a256-787d-4a6f-8a8a-cf6ab767f12d}" Name="ContentType" />
11:  <FieldRef ID="{fa564e0f-0c70-4ab9-b863-0177e6ddd247}" Name="Title" Required="TRUE" ShowInNewForm="TRUE" ShowInEditForm="TRUE" />
12:  <FieldRef ID="{c3a92d97-2b77-4a25-9698-3ab54874bc6f}" Name="Predecessors" />
13:  <FieldRef ID="{a8eb573e-9e11-481a-a8c9-1104a54b2fbd}" Name="Priority" />
14:  <FieldRef ID="{c15b34c3-ce7d-490a-b133-3f4de8801b76}" Name="Status" />
15:  <FieldRef ID="{d2311440-1ed6-46ea-b46d-daa643dc3886}" Name="PercentComplete" />
16:  <FieldRef ID="{53101f38-dd2e-458c-b245-0c236cc13d1a}" Name="AssignedTo" />
17:  <FieldRef ID="{7662cd2c-f069-4dba-9e35-082cf976e170}" Name="Body" />
18:  <FieldRef ID="{64cd368d-2f95-4bfc-a1f9-8d4324ecb007}" Name="StartDate" />
19:  <FieldRef ID="{cd21b4c2-6841-4f9e-a23a-738a65f99889}" Name="DueDate" />
20:  <FieldRef ID="{58ddda52-c2a3-4650-9178-3bbc1f6e36da}" Name="WorkflowLink" />
21:  <FieldRef ID="{16b6952f-3ce6-45e0-8f4e-42dac6e12441}" Name="OffsiteParticipant" />
22:  <FieldRef ID="{4a799ba5-f449-4796-b43e-aa5186c3c414}" Name="OffsiteParticipantReason" />
23:  <FieldRef ID="{18e1c6fa-ae37-4102-890a-cfb0974ef494}" Name="WorkflowOutcome" />
24:  <FieldRef ID="{e506d6ca-c2da-4164-b858-306f1c41c9ec}" Name="WorkflowName" />
25:  <FieldRef ID="{ae069f25-3ac2-4256-b9c3-15dbc15da0e0}" Name="GUID" />
26:  <FieldRef ID="{8d96aa48-9dff-46cf-8538-84c747ffa877}" Name="TaskType" />
27:  <FieldRef ID="{17ca3a22-fdfe-46eb-99b5-9646baed3f16}" Name="FormURN" />
28:  <FieldRef ID="{78eae64a-f5f2-49af-b416-3247b76f46a1}" Name="FormData" />
29:  <FieldRef ID="{8cbb9252-1035-4156-9c35-f54e9056c65a}" Name="EmailBody" />
30:  <FieldRef ID="{47f68c3b-8930-406f-bde2-4a8c669ee87c}" Name="HasCustomEmailBody" />
31:  <FieldRef ID="{cb2413f2-7de9-4afc-8587-1ca3f563f624}" Name="SendEmailNotification" />
32:  <FieldRef ID="{4d2444c2-0e97-476c-a2a3-e9e4a9c73009}" Name="PendingModTime" />
33:  <FieldRef ID="{35363960-d998-4aad-b7e8-058dfe2c669e}" Name="Completed" />
34:  <FieldRef ID="{1bfee788-69b7-4765-b109-d4d9c31d1ac1}" Name="WorkflowListId" />
35:  <FieldRef ID="{8e234c69-02b0-42d9-8046-d5f49bf0174f}" Name="WorkflowItemId" />
36:  <FieldRef ID="{1c5518e2-1e99-49fe-bfc6-1a8de3ba16e2}" Name="ExtendedProperties" />
37:  </FieldRefs>
38:  <XmlDocuments>
39:  <XmlDocument NamespaceURI="http://schemas.microsoft.com/sharepoint/v3/contenttype/forms">
40:  <FormTemplates xmlns="http://schemas.microsoft.com/sharepoint/v3/contenttype/forms">
41:  <Display>ListForm</Display>
42:  <Edit>ListForm</Edit>
43:  <New>ListForm</New>
44:  </FormTemplates>
45:  </XmlDocument>
46:  <XmlDocument NamespaceURI="http://schemas.microsoft.com/sharepoint/v3/contenttype/forms/url">
47:  <FormUrls xmlns="http://schemas.microsoft.com/sharepoint/v3/contenttype/forms/url">
48:  <Edit>Workflow1Forms/Task1Form.aspx</Edit>
49:  </FormUrls>
50:  </XmlDocument>
51:  </XmlDocuments>
52:  </ContentType>
53:
54:
You see the “FormUrls” tag? Inside this tag we specify our custom form template we created before.
The new content type is derived from the “Workflow Task” content type 0×010801. – In the “FieldRefs” section we add our fields we need inside the workflow.
13. Now we need to add the field definitions of our custom fields to the “Schema.xml”. Copy them from the “Elements.xml”  file of project item “Workflow 1 Fields” into the “Fields” tag of “Schema.xml”:
image
Furthermore you need to add a field definition for the field “Completed”:
1:  <Field ID="{35363960-D998-4aad-B7E8-058DFE2C669E}" Name="Completed"
2:  SourceID="http://schemas.microsoft.com/sharepoint/v3"
3:  StaticName="Completed" Group="Base Columns" Type="Boolean"
4:  DisplayName="Completed" Hidden="TRUE" Sealed="TRUE"
5:  Overwrite="TRUE" xmlns="http://schemas.microsoft.com/sharepoint/">
6:  <Default>FALSE</Default>
7:  </Field> 
14. Now deploy the project.
While deployment you may get this dialog:
image
Check “Do not prompt…”. Press “Resolve Automatically”  – it’s your only option Smile.
15. Have a look into the site using the browser. – We will test our “Edit” form. Remember that we did not specify special “New” form or “Display” form. This you could do the same way as you created the “Edit” form.
We see our lists in the Quick Launch.
image
Open the “Workflow 1 Tasks” list. On the Ribbon open the “Items” tab. We see our Content Type in the New Item submenu:
image
Create an item of this type. You see a standard “New” form and on it you see our three “Test” fields:
image
Enter some data and press  “Save”.
image
Open the item  in “Edit” form. Now you should see our custom list form.
image
If you click “Save As Draft” your changes will be stored in the task item. If you click “Complete Task” two item fields will be changed in addition to the changes made in the form: It sets “Status” to “Tasks_Completed” and “% Complete” to “100″. You can see this in the Code Behind file of the list form.
Test all buttons.
After “Complete Task”:
image
You see: “% Complete” is set to “100 %”.
So far our projects works as expected.